


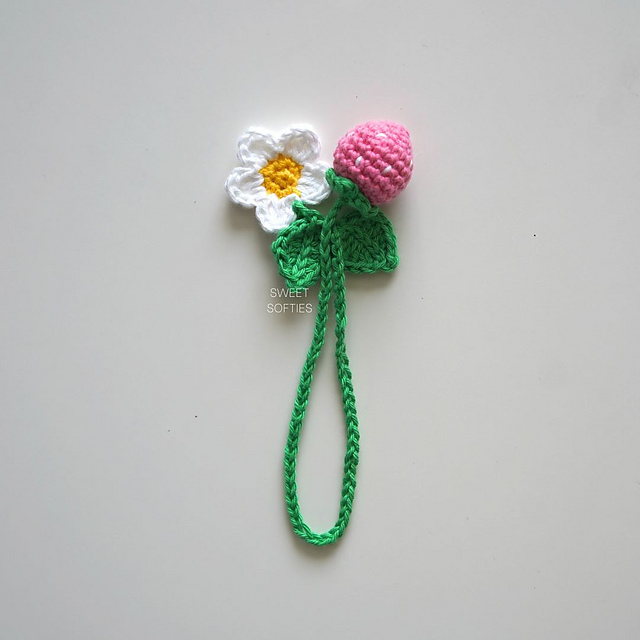
Bring the beauty of flowers to life with this soft and cuddly Plush Flower Bouquet! This beginner-friendly, low-sew crochet pattern creates a timeless floral arrangement that never wilts. Featuring puff stitch flowers, delicate leaves, a frilly bouquet wrap, and a charming ribbon bow, this design is perfect for gifts, décor, and craft markets.
Whether you're making a thoughtful present for a loved one or a unique display piece, this pattern is quick to work up and endlessly customizable. Choose your favorite colors and yarn textures to create a bouquet that suits any occasion—without the worry of wilting or allergies.

Uses
- Product craft fairs and markets (perfect for Spring and Summer!)
- Home decor (it makes a cozy desk ornament!)
- Gifting (for so many occasions!)
Here are some gift ideas:
- Birthday Gift – A beautiful, handmade bouquet that never wilts.
- Anniversary Gift – A unique and sentimental keepsake for a partner or loved one.
- Get Well Soon Gift – A cheerful, allergy-free alternative to fresh flowers.
- Baby Shower Gift – A sweet decoration for a nursery.
- Bridal Shower Gift – Can be used as a bouquet or wedding decor.
- Housewarming Gift – A cozy touch for a new home.
- Graduation Gift – Symbolizing growth, success, and new beginnings.
- Valentine’s Day Gift – A romantic alternative to real flowers.
- Just Because – A heartfelt way to show appreciation to a friend or loved one.

Recommended Yarn
This pattern is designed with super bulky weight chenille velvet yarn (Honey Bunny yarn). It's perfect for a plush and ultra soft finish! However, you can use other yarns and fibers for a different look. Thinner yarns, such as DK or worsted weight, can be used to create a smaller, keychain version of this pattern.
Want More?
For a charming variation of this pattern, check out the Plush Flower Pot! This adorable decorative piece brings a cozy touch to any desk or workspace. Place it on a windowsill for a cheerful, uplifting accent that adds beauty and warmth to any room!

PDF Pattern
The PDF pattern is printable, ad-free, easy to read, and helps support Sweet Softies! (If you enjoy my free patterns, you can consider it as a donation to me when you buy one of my pattern PDFs! It allows me to maintain my blog and continue sharing more free patterns.)

PLUSH FLOWER BOUQUET
Free Amigurumi Crochet Pattern
Terms of Use & Copyright Notice © 2025 Sweet Softies (www.sweetsofties.com). You have permission to sell finished products made from this pattern, but you must credit Sweet Softies as the owner/creator of this pattern by linking to my website (www.sweetsofties.com). No wholesale. You may not translate, copy, alter, or sell my patterns in part or in whole in any way. My patterns may not be used in video tutorials or teaching online classes. My patterns may be used in teaching in-person classes ONLY with written consent from me. You may link to this pattern but you may not copy any part of the pattern instructions on other websites.

Pattern Info
Size:
5 inches tall and 5 inches across
Level of Difficulty:
★★☆☆☆ Familiar BeginnerStitches/Terms Used:
- FO = fasten off
- YO = yarn over
- ch = chain
- sl st = slip stitch
- sc = single crochet
- inc = increase (insert 2 sc in same st)
- dec = decrease (sc 2 sts together)
- hdc = half double crochet
- dc = double crochet
- BLO = back loops only
Materials:
- Super bulky weight 6 chenille velvet yarn (I used Hobbii Toucan yarn)
- 5mm crochet hook (I use these)
- Stuffing
- Yarn needle
- Scissors
Crochet Instructions
Note: The free version of the pattern comes in written instructions (below). If you want an ad-free printable version of the written instructions, please download the low-cost PDF pattern.
FLOWERS (x3)
Below is the step-by-step video tutorial for crocheting the flower. Written instructions are as follows.Start with yellow yarn for the center.
R1: Ch 2. Insert 10 sc in the 2nd ch from hook. (10)
Sl st into the first sc made in R1, pulling a new yarn color through to begin the petals.
R2: Note that each petal takes up 2 sts of space, and are made of double crochet clusters.
Ch 3. (YO, insert hook into the same st, pull up a loop as tall as the ch-3. YO, pull through two loops) x 3. (YO, insert hook into the next st, pull up a loop as tall as the ch-3. YO, pull through two loops) x 3. YO and pull through all 7 loops on the hook. Ch 3, and sl st into the same st. This completes one petal.
Repeat to complete a total of 5 petals. The “wrong side” of the flower shows the puffy petals and will face up. Pull all yarn ends into the other side.
LEAVES (x3)
Below is the step-by-step video tutorial for crocheting the leaf. Written instructions are as follows.Starting with a long tail that will be used for sewing later, ch 6.
Starting from the 2nd ch from the hook: Sl st, sc, hdc, dc 2, hdc+sc in the next st.
Turn and continue working on the other side of the leaf. Sc+hdc in the first st. Dc 2 in the next st. Hdc, sc, sl st.
FO with a tail for weaving in.
BASE & BOUQUET
Start with green yarn.R1: Ch 2. Insert 8 sc in the 2nd ch from hook. (8)
R2: Inc around. (16)
R3: (Sc, inc) x 8. (24)
R4: (Sc 2, inc) x 8. (32)
R5: (Sc 3, inc) x 8. (40)
R6: Sc around. (40)
Switch to white yarn.
R7: Sc around in BLO. (40)
R8: (Sc 8, dec) x 4. (36)
R9: Sc around. (36)
R10: (Sc 7, dec) x 4. (32)
R11: Sc around. (32)
R12: (Sc 6, dec) x 4. (28)
R13: (Sc 5, dec) x 4. (24)
R14: (Sc 2, dec) x 6. (18)
Stuff the inside of the bouquet. Switch back to green yarn for the stems.
R15: Dec around in BLO. (9)
R16-R17: Sc around. (9)
FO with a long tail for sewing the opening closed.
Top Frill:
This round will be crocheted in the unworked front loops created in R7.
- Attach white yarn to the first unworked front loop. Make a ch. The first sc will be worked in this same st.
- (Sc in the first st. Hdc+dc in the second st. Dc+hdc in the third st. Sc+sl st in the fourth st) x 10.
- FO with a tail for weaving in.
Bottom Frill:
This round will be crocheted in the unworked front loops created in R15.
- Attach white yarn to the first unworked front loop. Make a ch. The first sc will be worked in this st.
- (Sc in the first st. Hdc+sc in the second st. Sl st in the third st) x 6.
- FO with a tail for weaving in.
Center Ribbon:
This round will be crocheted between R10-R11 of the bouquet.
- Ch 16.
- Insert hook into a st between R10-R11 of the bouquet. Use the surface sl st method to crochet around the entire round. Tip: To avoid crocheting in a continuous spiral, make sure to adjust by moving one round up or down (stay between R10-R11) at the start of the round.
- Then, ch 16 and trim the starting and ending yarn tails.
FINISHING
- Arrange the leaves equally spaced around the top surface of the bouquet, with the base positioned between R3-R4 of the bouquet. Sew them down securely.
- Arrange each flower between two leaves. Sew them down securely.
- Weave in all ends.


Want to share your finished Plush Flower Bouquet?
I'd love to see what you make on Instagram, @SweetSofties!
Thank you for reading, and hope you had a fun time crocheting this project! If you'd like to help out my blog, feel free to check out my post, "5 Ways to Support my Blog!"
You might like my other designs if you enjoyed this one! Simply click on the image below for the pattern, or check out all my free patterns here.

I'd love to see your finished work from my designs! Here are links for sharing photos of your creations:
Best wishes,

Disclosure: This post may contain affiliate links, meaning I get a commission if you decide to make a purchase through my links, at no cost to you.
.jpg)
.jpg)


